A second Virginia circuit court has now indicated that it will enter an injunction against enforcement of Virginia’s new “assault firearm” and magazine ban. This newest ruling comes out of Washington County in the case filed by the NRA and argued by Senator Bill Stanley.
That is unquestionably good news for Virginia gun owners, firearms dealers, and Second Amendment advocates. However, it is also important not to overstate what we currently know.
The NRA has characterized the Washington County ruling as a major victory. Senator Stanley has gone further on social media, stating that the injunction is a complete statewide injunction and advising anyone who has trouble buying or selling firearms to contact his office.
I hope that interpretation proves correct.
But as of the time of this writing, no final order has been entered in either the Washington County case or the earlier Lancaster County case. Until those orders are entered and reviewed, there remain several critical legal questions: exactly who is enjoined, and exactly what conduct is protected?
The Lancaster County Injunction
The first major injunction came from Lancaster County, where a circuit court judge granted preliminary injunctive relief against enforcement of the new law. That ruling was a significant victory, but it also raised practical questions.
If the injunction only restrains the named defendants, particularly the Virginia State Police, then it may prevent the State Police from denying background checks based on the new law. But that does not necessarily answer every question for every FFL, purchaser, seller, local law-enforcement officer, or Commonwealth’s Attorney.
In other words, an injunction against the State Police may keep the background-check system from being used as the enforcement mechanism for the ban. But unless the order is broader, it may not automatically bind every possible enforcement actor in Virginia and may not protect FFLs from potential civil liability under HB21 should the law ultimately be upheld.
That is why the precise language of the final order matters.
The Washington County Opinion Letter
The Washington County case appears to follow a similar structure, at least based on the opinion letter presently available.
Download (PDF, 644KB)
The summary paragraph of that opinion letter states that the defendants are enjoined. That language is important. It sounds very similar to what occurred in the Lancaster County case: the court is enjoining the defendants before it.
If the final order does no more than enjoin the named defendants, then many of the same unresolved issues remain. The practical effect may be substantial, especially if the named defendants include the officials responsible for implementing or administering the background-check process. But that is different from a universal declaration that no person, agency, locality, prosecutor, or civil plaintiff anywhere in Virginia can attempt to rely on the new law.
That distinction is not legal hair-splitting. It is the entire dragon in the cave.
Why “Statewide” Can Mean Different Things
There are at least two different ways people may be using the word “statewide.”
First, an injunction may have statewide practical effect because the defendant being enjoined operates statewide. For example, if the Virginia State Police are restrained from enforcing a law through the background-check system, that obviously affects transactions across Virginia.
Second, an injunction may be statewide in the broader sense that it restrains enforcement of the law by anyone, anywhere in the Commonwealth, including local law enforcement and Commonwealth’s Attorneys.
Those are not the same thing.
A court order can have a powerful statewide practical impact without eliminating every possible legal risk for every person involved in a firearm transaction. Until we see the final order, we should be careful about assuming that the Washington County injunction fully resolves those questions.
Why FFLs Still Need to Be Careful
Virginia firearms dealers are in a particularly difficult position.
If the State Police cannot deny background checks based on the new law, then many transactions may be able to proceed through the normal state background-check process. But that does not necessarily answer whether an FFL could later face some other form of legal exposure, especially if the order does not expressly bind local prosecutors, local law enforcement, or other state officials.
There is also the separate concern of Virginia’s firearms industry liability law, HB 21. That law was not part of the Lancaster County injunction, and unless the Washington County order expressly addresses it, it remains a separate source of uncertainty.
That means dealers should not assume that a successful background check alone answers every legal question. It may answer the background-check question. It may not answer every possible criminal, civil, administrative, or licensing-risk question.
Pending Transfers and Approvals Started Before July 1
That uncertainty also creates a very practical question for dealers who already have pending transfers or pending purchase approvals in the pipeline.
For FFLs who received firearms on transfer before July 1, or who have purchase transactions or approvals that began before July 1 but have not yet been fully completed, my advice is not to immediately return items to the manufacturer, cancel the transaction, or unwind the transfer merely because of the current uncertainty surrounding the law.
Instead, the dealer should consider asking the customer whether they are willing to wait until we have a final order in the pending injunction cases.
That is especially true in light of the Washington County opinion letter, which appears to imply that July 15 may be the date by which an order could be entered, or that an order may be entered shortly thereafter.
That does not mean every transaction is automatically safe to complete. It also does not mean an FFL should ignore the law or assume that every legal issue has been resolved. But where the firearm is already in the dealer’s possession, or the transaction was already underway before July 1, it may be premature to cancel everything before the actual injunction order is entered and reviewed.
In short, if the customer is willing to wait, waiting may preserve options. Canceling or returning the item immediately may unnecessarily destroy them.
The Grandfathering Problem Also Remains
Another unresolved issue involves the law’s grandfathering language. The law grandfathers certain items lawfully possessed before July 1, 2026.
That creates an immediate practical concern if the injunctions are later stayed, narrowed, reversed, or dissolved.
If someone purchases an affected firearm or magazine after July 1 while an injunction is in place, and the injunction is later overturned, are those items protected? Were they “lawfully possessed” before July 1? Obviously not. Were they lawfully possessed because the law was enjoined at the time of purchase? That is a different and much more complicated question.
The answer may depend on the wording of the statute, the wording of the injunction, the effect of any later appellate order, and whether any court later treats the injunction period as legally protective for purchasers and dealers.
That issue has not gone away merely because a second circuit court has indicated it will enter injunctive relief.
This Is a Major Development, But the Final Orders Matter
None of this is meant to minimize the importance of the Washington County ruling. Two state-court injunctions against the same law would be a major development. It also increases pressure on the Commonwealth and may improve the practical position of gun owners and dealers in the short term.
But the bottom line is this:
Until we have final orders from Lancaster County and Washington County, we do not yet know the full scope of the protection. If the final Washington County order is broader than the opinion letter, then the analysis may change. If the order expressly restrains enforcement of the law statewide by state and local actors, that would be very different from an order that simply enjoins the named defendants.
For now, the safe reading is this: the Washington County opinion letter is very encouraging, but unless the final order is broader than the summary language suggests, many of the same practical questions remain.
Virginia gun owners and FFLs should watch the actual text of the final orders, not just social-media summaries of them.

 Virginia Under Siege
 A Washington County Circuit Court judge has issued a major clarification in the pending challenge to Virginia’s new “assault firearm” and “large capacity magazine” restrictions, commonly referred to as SB 749.
 If you’ve been carrying the weight of an old charge or conviction, Virginia’s new record‑sealing law—which took effect July 1, 2026—may finally give you room to breathe again.
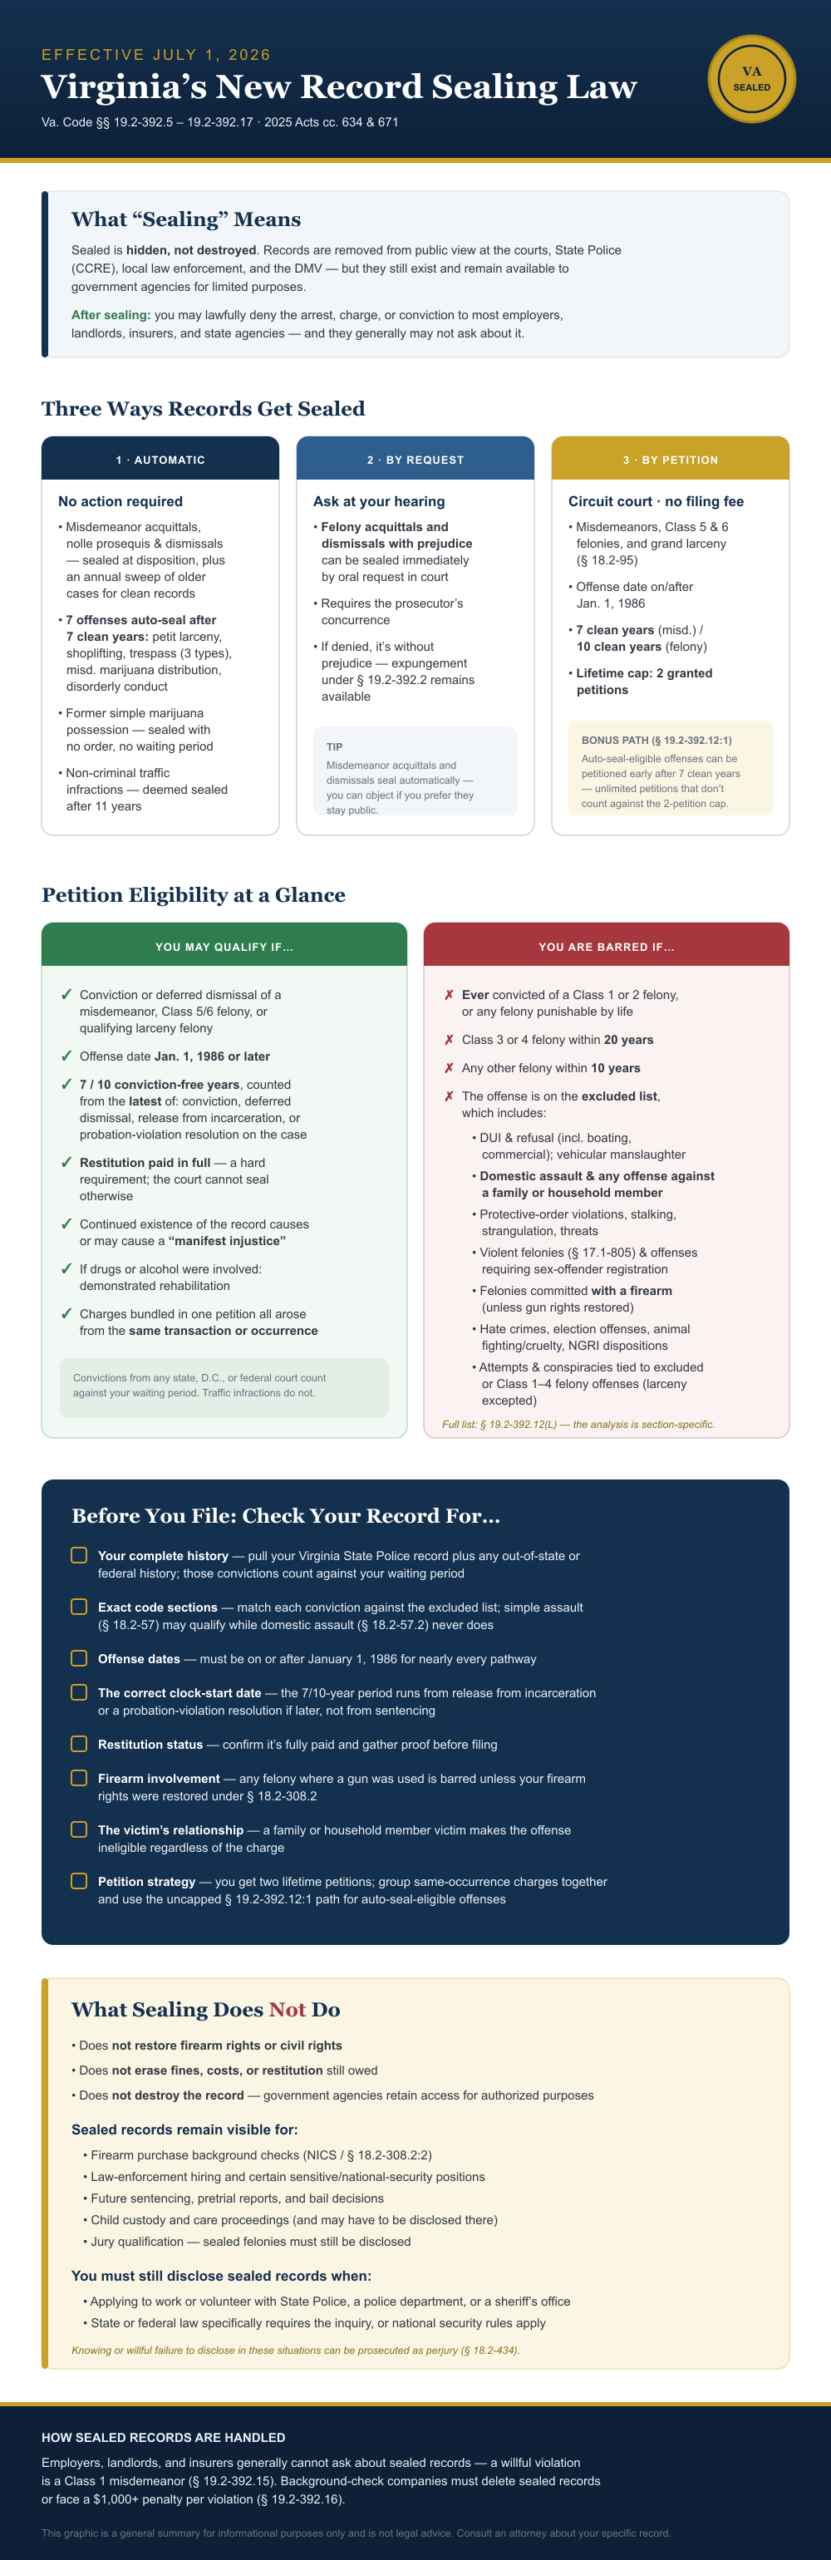
 We now have a copy of the final injunction order entered in the Lancaster County challenge to Virginia’s new “assault firearm” and magazine ban. I will embed a copy of the order below so readers can review the exact language for themselves.
 A second Virginia circuit court has now indicated that it will enter an injunction against enforcement of Virginia’s new “assault firearm” and magazine ban. This newest ruling comes out of Washington County in the case filed by the NRA and argued by Senator Bill Stanley.